Dry brisket is a common barbecue tragedy, often resulting from uneven cooking. Experts say mastering the “2-zone” cooking method, which involves creating distinct hot and cool areas within the grill or smoker, is key to achieving a tender, juicy final product. This technique allows for slow, indirect cooking, preventing the brisket from drying out.
Barbecue enthusiasts frequently encounter the disheartening reality of a dry, tough brisket. According to barbecue experts, one of the most pervasive reasons for this culinary disappointment lies in a failure to implement proper temperature control throughout the cooking process. Overcoming this challenge hinges on mastering the “2-zone” cooking method, a technique that separates the cooking area into distinct zones of varying heat intensity.
The Peril of Direct Heat: Understanding the “Why” Behind Dry Brisket
Direct heat is the enemy of brisket. Exposing the brisket directly to high temperatures sears the exterior before the interior has a chance to render its fat and connective tissues, resulting in a leathery bark and a dry, chewy center. “The most common mistake people make when smoking a brisket is cooking it too hot and too fast,” explains renowned pitmaster Aaron Franklin. This rapid cooking dehydrates the meat, forcing moisture out and leading to a less-than-desirable outcome. The intense heat also causes the proteins in the brisket to seize up and toughen, exacerbating the dryness. In essence, direct heat transforms a cut of meat that should be meltingly tender into a tough, unappetizing slab. The science behind this lies in the collagen content of the brisket; slow, low heat allows the collagen to break down into gelatin, contributing to the moist, succulent texture that characterizes a well-cooked brisket. Direct heat bypasses this crucial process.
The 2-Zone Solution: A Path to Barbecue Brisket Nirvana
The 2-zone cooking method offers a solution to this common pitfall. This technique involves setting up the grill or smoker with two distinct zones: a direct heat zone and an indirect heat zone. The direct heat zone is where the heat source (charcoal, wood, or gas) is concentrated, while the indirect heat zone is shielded from the direct flame. This separation allows for cooking the brisket primarily with indirect heat, promoting slow, even cooking and preventing it from drying out. The indirect heat gently coaxes the brisket to render its fat and break down its connective tissues, resulting in a tender, juicy, and flavorful final product.
Setting Up Your Grill for 2-Zone Cooking
The setup for 2-zone cooking varies depending on the type of grill or smoker you are using:
- Charcoal Grill: Arrange the lit charcoal on one side of the grill, leaving the other side empty. This creates a hot zone directly above the charcoal and a cool zone on the opposite side.
- Gas Grill: Light the burners on one side of the grill, leaving the burners on the other side off. This creates a hot zone directly above the lit burners and a cool zone on the opposite side.
- Smoker: Most smokers are designed for indirect cooking, but it’s still important to manage the heat source to maintain a consistent temperature. Use a water pan to help regulate the temperature and add moisture to the cooking chamber. Position the brisket away from the direct heat source within the smoker.
The Art of Temperature Management: The Key to Success
Maintaining a consistent temperature in both zones is crucial for successful 2-zone cooking. The ideal temperature for cooking brisket is between 225°F and 275°F (107°C and 135°C). Use a reliable thermometer to monitor the temperature in both the hot and cool zones, and adjust the heat source (charcoal, gas, or wood) as needed to maintain the desired temperature range. Remember that temperature fluctuations are normal, but try to minimize them as much as possible. Consistent monitoring is key.
Placement is Paramount: Where to Put the Brisket
The placement of the brisket within the 2-zone setup is equally important. Place the brisket on the indirect heat zone, away from the direct flame. This allows the brisket to cook slowly and evenly without drying out. For particularly thick briskets, consider rotating the brisket periodically to ensure even cooking on all sides. The goal is to expose all parts of the brisket to the gentle, consistent heat of the indirect zone.
The Importance of Patience: Embrace the Slow Cook
Patience is a virtue when it comes to cooking brisket. The cooking process can take anywhere from 12 to 18 hours, depending on the size and thickness of the brisket. Resist the urge to rush the process by increasing the temperature. Slow, low cooking is essential for rendering the fat and breaking down the connective tissues, resulting in a tender, juicy brisket. “Low and slow is the way to go,” emphasizes Franklin.
The Stall: Understanding and Overcoming the Plateau
During the cooking process, the brisket will likely encounter a phenomenon known as “the stall.” This is a period where the internal temperature of the brisket plateaus for several hours, typically between 150°F and 170°F (66°C and 77°C). The stall is caused by evaporative cooling, as moisture from the brisket evaporates and cools the surface of the meat.
To overcome the stall, many pitmasters employ the “Texas Crutch,” which involves wrapping the brisket in butcher paper or aluminum foil. Wrapping the brisket helps to trap moisture and increase the internal temperature, speeding up the cooking process. However, wrapping can also soften the bark, so it’s a trade-off between speed and texture.
The Texas Crutch: To Wrap or Not to Wrap?
The decision of whether or not to wrap the brisket is a matter of personal preference. Wrapping speeds up the cooking process and helps to retain moisture, but it can also soften the bark. Some pitmasters prefer to cook the brisket unwrapped for the entire cooking process, resulting in a firmer, more flavorful bark. Others prefer to wrap the brisket to overcome the stall and ensure a tender, juicy final product. Experiment with both methods to see which one you prefer.
If you choose to wrap, use butcher paper or aluminum foil. Butcher paper allows the brisket to breathe, resulting in a slightly firmer bark. Aluminum foil traps more moisture, resulting in a softer bark. Wrap the brisket tightly in the paper or foil, ensuring that all sides are sealed.
Probing for Tenderness: Knowing When It’s Done
The most reliable way to determine if the brisket is done is to probe it for tenderness. Use a thermometer or a skewer to probe the thickest part of the brisket. The brisket is done when the probe slides in and out with little to no resistance, similar to probing softened butter. The internal temperature of the brisket should be between 203°F and 205°F (95°C and 96°C), but the probe test is a more reliable indicator of doneness.
Resting is Essential: Allowing the Magic to Happen
Once the brisket is cooked, it’s crucial to allow it to rest before slicing. Resting allows the juices to redistribute throughout the meat, resulting in a more tender and flavorful final product. Wrap the brisket in butcher paper or foil and place it in a cooler or insulated container for at least one hour, or preferably longer. The longer the brisket rests, the better it will be. Some pitmasters rest their briskets for up to four hours or even overnight.
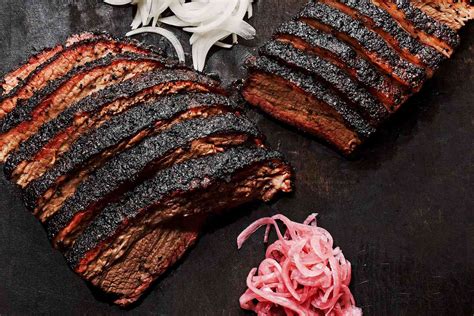
Slicing Against the Grain: Maximizing Tenderness
Slicing the brisket against the grain is essential for maximizing tenderness. The grain of the brisket refers to the direction of the muscle fibers. Slicing against the grain shortens the muscle fibers, making the brisket easier to chew. Identify the grain of the brisket and slice it perpendicular to the grain. Use a sharp knife to slice the brisket into thin, even slices.
Choosing the Right Cut: The Importance of Selection
The quality of the brisket also plays a significant role in the final outcome. Choose a brisket that is well-marbled with fat, as the fat will render during the cooking process and contribute to the tenderness and flavor of the meat. Look for a brisket that is flexible and has a good amount of “give” when pressed. A stiff, rigid brisket is likely to be tough and dry.
Brisket consists of two main muscles: the point (also known as the deckle) and the flat. The point is the fattier, more flavorful muscle, while the flat is the leaner, more uniform muscle. Many pitmasters prefer to cook the entire packer brisket, which includes both the point and the flat. This allows for a wider range of flavors and textures.
Trimming the Brisket: Removing Excess Fat
Trimming the brisket is an important step in preparing it for cooking. Remove any excess fat from the surface of the brisket, leaving about ¼ inch of fat cap. The fat cap will help to protect the brisket from drying out during cooking and will also contribute to the flavor of the meat. Trim away any hard, inedible pieces of fat.
Seasoning the Brisket: A Simple Approach
When it comes to seasoning brisket, less is often more. A simple rub consisting of salt, pepper, and garlic powder is all that’s needed to enhance the natural flavor of the meat. Some pitmasters also add paprika, chili powder, or other spices to their rubs. Apply the rub liberally to all sides of the brisket, ensuring that it is evenly coated.
Wood Selection: Enhancing the Smoke Flavor
The type of wood you use for smoking brisket can have a significant impact on the flavor of the final product. Oak is a popular choice for smoking brisket, as it imparts a mild, smoky flavor that complements the beef. Hickory is another good option, but it has a stronger flavor that can be overpowering if used in excess. Mesquite has a very strong flavor and is best used sparingly. Experiment with different types of wood to see which one you prefer. Pecan, apple, and cherry wood are also suitable choices.
Maintaining Moisture: The Role of Water Pans
Using a water pan in the smoker can help to maintain moisture in the cooking chamber and prevent the brisket from drying out. The water pan creates a humid environment that helps to slow down the evaporation of moisture from the brisket. Refill the water pan as needed throughout the cooking process.
Experimentation is Key: Developing Your Own Style
Cooking brisket is an art form, and there’s no single “right” way to do it. Experiment with different techniques and recipes to develop your own style. Don’t be afraid to make mistakes, as that’s how you learn. The most important thing is to have fun and enjoy the process.
Brisket Throughout History:
Brisket wasn’t always a barbecue staple. In the past, it was considered an undesirable cut of meat due to its toughness. However, resourceful cooks discovered that slow-cooking methods could transform this tough cut into a tender and flavorful delicacy.
The history of brisket barbecue is closely tied to the history of meatpacking in the United States. As meatpacking plants became more efficient, brisket became more readily available and affordable. Over time, different regional styles of brisket barbecue emerged, each with its own unique flavor profile.
Texas-style brisket is perhaps the most well-known, characterized by its simple rub of salt and pepper and its slow-smoked cooking process. Kansas City-style brisket is often sweeter and more heavily sauced, while Memphis-style brisket is typically dry-rubbed and served without sauce.
Modern Innovations:
While the fundamental principles of brisket barbecue remain the same, modern technology has introduced new tools and techniques that can help pitmasters achieve even better results.
Temperature controllers, for example, can automatically regulate the temperature of the smoker, ensuring a consistent and even cooking process. Bluetooth-enabled thermometers allow pitmasters to monitor the internal temperature of the brisket remotely, without having to open the smoker.
Sous vide cooking, a technique that involves cooking food in a water bath at a precise temperature, is also gaining popularity among brisket enthusiasts. Sous vide brisket can be incredibly tender and juicy, but it lacks the smoky flavor of traditional barbecue.
Beyond the Basics:
Once you’ve mastered the basics of brisket barbecue, there are endless possibilities for experimentation and creativity.
Try experimenting with different rubs and sauces, or try smoking the brisket with different types of wood. You can also try using different cooking techniques, such as braising or smoking the brisket in a Dutch oven.
Brisket can also be used in a wide variety of dishes, from sandwiches and tacos to chili and stew. Get creative and have fun exploring the many ways to enjoy this delicious cut of meat.
The Community of Barbecue:
Barbecue is more than just a way of cooking food; it’s a community. Pitmasters around the world share their knowledge and passion for barbecue, helping each other to improve their skills and create even better food.
Online forums, barbecue competitions, and local barbecue clubs provide opportunities for pitmasters to connect with each other and share their experiences. Attending a barbecue competition is a great way to learn new techniques and taste some of the best barbecue in the world.
The Future of Brisket:
Brisket barbecue is a constantly evolving culinary tradition. As new techniques and technologies emerge, pitmasters will continue to push the boundaries of what’s possible.
Sustainability is also becoming an increasingly important consideration for brisket enthusiasts. As demand for brisket continues to grow, it’s important to source the meat from sustainable and ethical sources.
The future of brisket barbecue is bright, and it’s sure to remain a beloved culinary tradition for generations to come.
FAQ: Brisket Barbecue
1. What is the 2-zone cooking method and why is it important for cooking brisket?
The 2-zone cooking method involves creating distinct hot and cool areas within your grill or smoker. This is crucial for brisket because it allows for slow, indirect cooking. Direct heat can dry out the brisket, while the 2-zone method ensures even cooking, rendering the fat and connective tissues for a tender, juicy result. As Aaron Franklin notes, “The most common mistake people make when smoking a brisket is cooking it too hot and too fast,” something the 2-zone method directly addresses.
2. How do I set up my grill or smoker for 2-zone cooking?
- Charcoal Grill: Pile lit charcoal on one side, leaving the other side empty.
- Gas Grill: Light burners on one side, leaving the others off.
- Smoker: Ensure proper airflow and a water pan for moisture, placing the brisket away from the direct heat source. The key is to create a distinct hot and cool zone, allowing for indirect cooking.
3. What is “the stall” and how do I overcome it?
“The stall” is a plateau in the brisket’s internal temperature (around 150-170°F) caused by evaporative cooling. To overcome it, you can use the “Texas Crutch,” which involves wrapping the brisket in butcher paper or aluminum foil. This traps moisture and speeds up the cooking process, though it may soften the bark. The decision to wrap is a personal preference, balancing speed with bark texture.
4. How do I know when my brisket is done cooking?
The most reliable way is to probe the thickest part of the brisket. It’s done when the probe slides in and out with little to no resistance, like probing softened butter. While the internal temperature should be between 203°F and 205°F, the probe test is a more accurate indicator of doneness.
5. Why is resting the brisket so important?
Resting allows the juices to redistribute throughout the meat, resulting in a more tender and flavorful final product. Wrap the brisket and place it in a cooler or insulated container for at least an hour, or longer. The longer it rests, the better.